Overview
When you run an underwrite with In-App Parsing enabled, Archer reads your uploaded Rent Roll and/or T12 Operating Statement, automatically maps and interprets the data, and guides you through a structured review process before generating your underwrite as an Excel file.
Archer handles the following automatically:
- Maps column headers from your Rent Roll to Archer's standard schema
- Interprets charge codes into plain-language categories (e.g., "gar" → Parking Income, "empldisc" → Employee Discount)
- Pre-fills missing floor plan details including beds, baths, unit type, and square footage
- Identifies time periods in your T12, including single-column YTD versus full-year statements
- Maps every T12 line item to your Chart of Accounts, identifying headers and subtotals to prevent double-counting
- Validates parsed NOI against the original file to surface any mapping discrepancies
- Provides live Rent Roll and Financial analytics benchmarked against market comps before the underwrite runs
Which steps apply to me? The workflow includes only the steps relevant to the files you upload: Rent Roll only → Steps 2–5; T12 only → Steps 6–8; Both files → all steps; No files → Predictive Underwrite only, In-App Parsing not triggered.
Step 1: Run Underwrite Modal
Open the Run Underwrite modal and complete property details and operating statement settings.
Required: Property Type, Unit Count
Recommended (improve quality score and comp accuracy): Average Unit SqFt, Year Built, Property Style, Property Class, Year Renovated
Operating Statements: Upload your T12 and/or Rent Roll. Rent Roll as of Date is required when uploading a Rent Roll.
The "Use in-app parsing" checkbox is enabled by default — leaving it checked launches the step-by-step workflow below.
🔒 Pro plan only: Uncheck to skip the in-app workflow. Parsing review will occur in Excel after the underwrite is generated. Can also be disabled at the account level by your administrator.
💡 Tip: Complete as many recommended fields as possible — a higher Underwriting Quality score means more accurate comp matching and better analytics throughout.
💡 Tip: The Rent Roll as of Date must reflect the actual snapshot date of the rent roll, not the upload date.

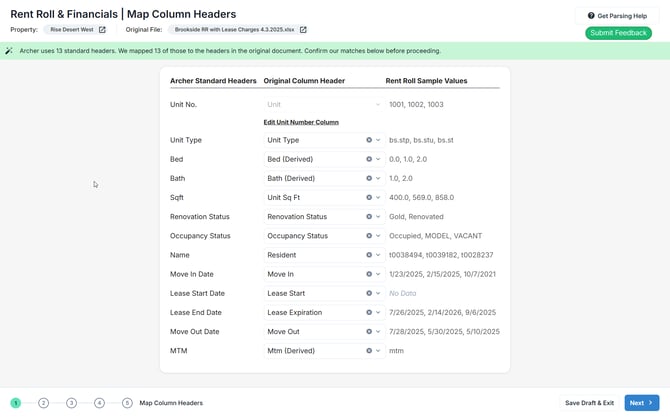
Step 2: Map Rent Roll Columns
Applies when a Rent Roll is uploaded.
What Archer does automatically: Maps your file's column headers to Archer's 13 standard headers.
What you do: Review each mapping and correct any that are wrong or missing. Pay particular attention to: Unit Number (construct from multiple columns if needed), Floor Plan, Bed and Bath (required), and SqFt, Lease Type, Renovation Status, Occupancy Status, Move In Date, Lease Start/End Date where available.
Note: Archer fills data gaps automatically — e.g., using Move In Date as a substitute for Lease Start Date when absent.
💡 Tip: Make sure your Rent Roll includes a clear unit number column, floor plan name, and lease dates before uploading.
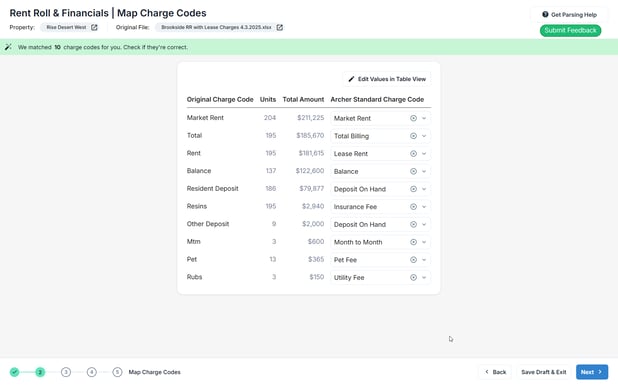
Step 3: Map Charge Codes
Applies when a Rent Roll is uploaded.
What Archer does automatically: Maps all charge codes to Archer's standard library. Abbreviated codes are interpreted ("gar" → Parking Income), similar codes are grouped, and Market Rent is identified from available data.
What you do: Review each mapping and correct inaccuracies. Select "Edit Values in Table View" to edit underlying values before proceeding.
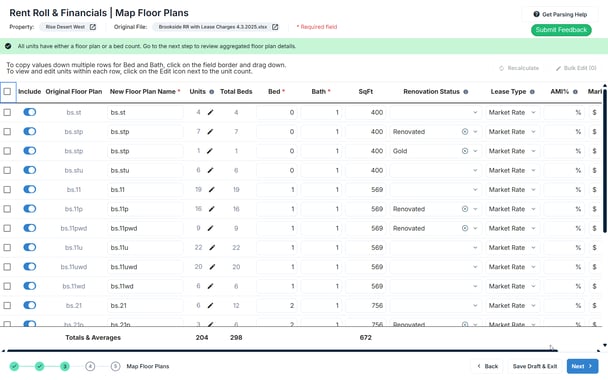
Step 4: Map Floor Plans
Applies when a Rent Roll is uploaded.
What Archer does automatically: Pre-fills floor plan details including name, unit count, beds, baths, sqft, Renovation Status, Lease Type, and Average Market Rent.
What you do: Review the table. Beds and Bath are required before you can proceed. You can also rename floor plans, exclude floor plans via the Include toggle, bulk edit rows, and click any unit count to edit individual units.
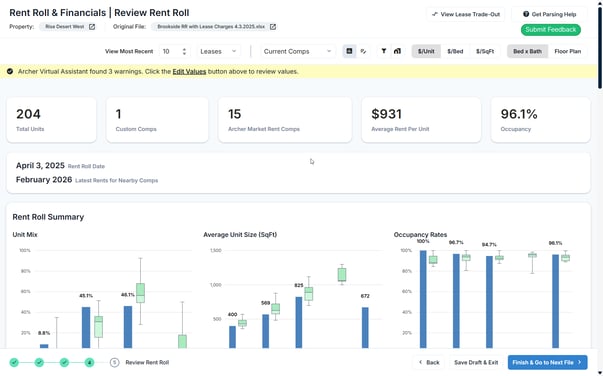
Step 5: Review Rent Roll Analytics
Applies when a Rent Roll is uploaded.
What you see: Full Rent Roll analytics benchmarked against market comps — unit mix, average unit size, occupancy rates, and average rent by floor plan type, all compared against comp range by quartile.
Outlier detection: Archer's Virtual Assistant flags outliers automatically. Click "Edit in Table View" to correct them.
Editing: Select "Edit Values" to open the full unit-level table and edit individual unit data. Save to instantly refresh analytics.
💡 Tip: If outliers are flagged, correct them before moving on — unit-level corrections here improve the quality of your final underwrite.
Click "Finish & Go to Next File" to proceed to the T12 steps.
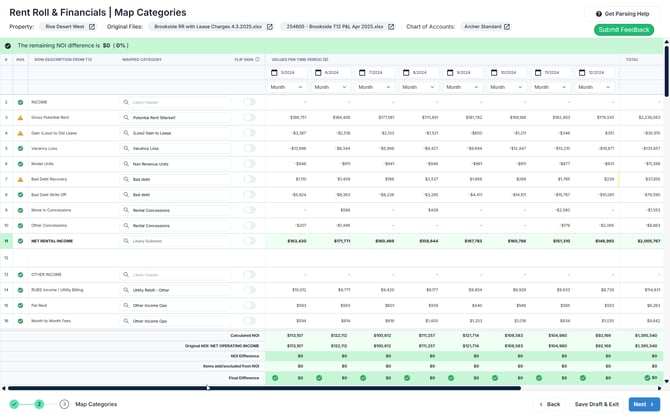
Step 6: Map Financial Subtotals
Applies when a T12 is uploaded.
What Archer does automatically: Identifies the Total Revenue, Total Expense, and NOI rows in your T12 to use as benchmarks.
What you do: Confirm each of the three subtotal mappings is correct. Use the dropdown to correct any wrong mapping. Archer will warn you if it cannot locate a subtotal or if values don't reconcile.
Note: These values are used in the steps that follow to calculate NOI variance and confirm line items sum correctly.

Step 7: Map Financial Categories
Applies when a T12 is uploaded.
What Archer does automatically: Identifies time periods, maps every line item to your Chart of Accounts, identifies headers and subtotals to prevent double-counting, and shifts items into the correct income/expense bucket per your COA.
What you do: Review the full line item mapping table. For each row you can change the Mapped Category, toggle Flip Sign, or mark a row as a Header.
NOI Variance: At the bottom, Archer shows Calculated NOI, Original NOI, NOI Difference (✓ or ⚠), and Items Added/Excluded from NOI.
Note: A non-zero Final Difference doesn't necessarily indicate an error — it may reflect COA-driven reclassifications.
💡 Tip: A persistent NOI difference that can't be explained by COA reclassifications usually means a line item is mapped to the wrong category.
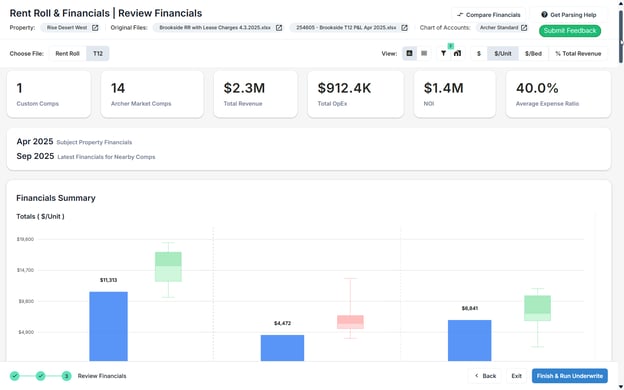
Step 8: Review Financial Analytics
Applies when a T12 is uploaded.
What you see: Financial analytics benchmarked against market comps — Total Revenue, Total OpEx, NOI, Expense Ratio, and Financials Summary charts (Totals, NOI Margin, Capital Reserve) vs. comp range by quartile. Revenue Items breakdown with T12, T6, and T3 toggles.
Your financial comps are displayed at the granularity of your Chart of Accounts. Because Archer mapped every line item to your COA categories in the previous step, the analytics and benchmarking you see here reflect your own category structure — not a generic financial breakdown. This means you're comparing your property against market comps at the same level of detail you underwrite at.
Click "Finish & Run Underwrite" to proceed.
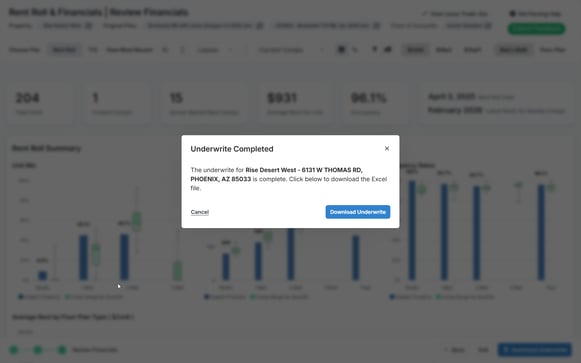
Step 9: Run & Download Underwrite
Archer generates your underwrite using confirmed parsed data from all previous steps. Typically completes within a few minutes.
When complete, click "Download Excel File" from the confirmation dialog. You can also download at any time from the All Activity page.
💡 Tip: Use "Save Draft & Exit" at any step to save progress and return later from the All Activity page.
🔒 Pro plan only: If you receive a revised file after an underwrite has been generated, you can re-parse in-app via the Parse Document button, or directly in Excel using the Add-in if you're already working in the model.